
Full Guide: Write an SEO-Optimized Blog in Under 1 Hour Using AI

Writing SEO-optimized content is one of the most effective ways to increase traffic to your website, establish authority, and build your brand. However, crafting high-quality, search engine-friendly blogs can often be time-consuming. With the advent of AI tools, this process can now be streamlined to the point where you can write a fully optimized blog in under an hour. This guide will walk you through each step, using AI to assist you in quickly creating a high-quality blog while ensuring it meets SEO best practices.
Step 1: Keyword Research – Laying the Foundation

SEMrush Keyword Overview Tool
Why It’s Important
The key to successful SEO lies in understanding your audience’s search behavior. Keyword research is the cornerstone of any SEO strategy, enabling you to identify the terms and phrases your target audience is using. By incorporating these keywords into your content, you improve your chances of ranking higher on search engine results pages (SERPs), thus attracting the right audience to your blog.
How to Do It
Use tools like Semrush, Ahrefs, or Google Keyword Planner to conduct keyword research. Start by typing in a broad term related to your topic, then narrow it down by focusing on long-tail keywords (phrases that are more specific and usually have lower competition). The ideal keywords to target should have:
High search volume: Indicates that a significant number of people are searching for this term.
Low competition: Gives you a better chance of ranking on the first page.
Relevance: The keyword should be directly related to the topic of your blog.
For example, if you're writing a blog about "time management tools," you can narrow it down to more specific phrases like "best tools for time management" or "time management software for teams."
Search Intent Matters
Understanding search intent—what the user is hoping to accomplish with their query—is crucial. People searching for "best productivity tools," for example, likely want recommendations, not a general definition of what productivity tools are. Tailor your content to match the search intent to improve user engagement and ranking potential.
Tip: Focus on long-tail keywords as they are more specific and less competitive, making it easier for your blog to rank.
Step 2: Use AI for Writing – Speeding Up the Drafting Process

ChatGPT Prompt Engineering
Why It’s Important
Artificial Intelligence (AI) has revolutionized content creation by allowing you to draft high-quality content in a fraction of the time. AI-powered writing tools like ChatGPT, Jasper, and Writesonic can generate coherent, relevant content based on your inputs. However, while AI is efficient, it needs direction to ensure the output aligns with your goals.
How to Do It
To get the most out of AI tools, you must provide them with a detailed prompt. Be specific about what you want, including:
The topic of your blog.
The keywords to focus on.
The structure (e.g., H1 and H2 headers).
The tone (e.g., formal, conversational, informative).
Here’s an example prompt for an AI tool:
"Write a 1000-word blog post about the 'Top 5 Time Management Tools' with H1 and H2 headers. Include the keywords 'time management tools,' 'boost productivity,' and 'best tools for time management.' Make it informative and engaging."
The AI tool will then generate a draft based on your specifications. While the initial output may be close to what you want, it’s important to refine it to match your voice and tone.
Optimizing AI Usage
AI-generated content can give you a significant head start, but don’t rely on it entirely. AI is excellent at pulling together facts, but it lacks human nuance, such as personal experiences, emotions, and cultural references. That’s where you come in to refine the draft.
Tip: After receiving the AI-generated draft, read through it and tweak sections where the tone may feel too robotic or where the flow can be improved.
Step 3: Review and Personalize – Add the Human Touch
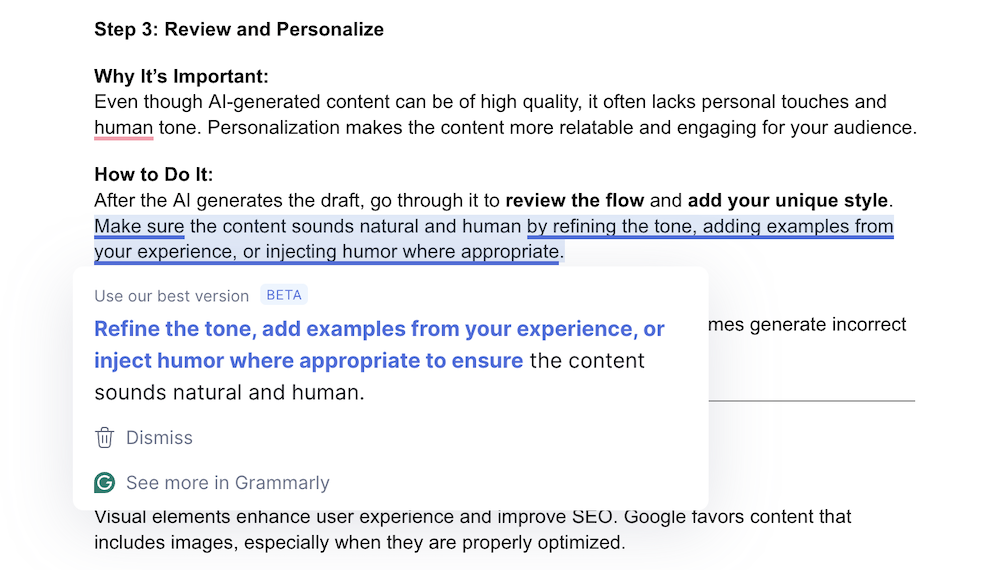
Using Grammarly For Editing
Why It’s Important
One major pitfall of AI-generated content is that it can lack the personal touches that make blogs more relatable and engaging. Personalization helps build a connection with your readers, making them more likely to trust your content and engage with your brand.
How to Do It
After the AI has provided you with a draft, go through it to personalize the content. Add examples from your own experience, anecdotes, or opinions that AI cannot replicate. This can be as simple as including a personal story or providing a practical tip based on your expertise.
Here are some steps to personalize your content:
Adjust the tone: Ensure the tone of the blog matches your brand’s voice. This could be friendly, authoritative, or casual, depending on your audience.
Insert personal examples: Readers love examples and stories. Incorporate your experience or client success stories to enhance the AI’s work.
Add humor or creativity: Don’t be afraid to make the content lively. Inject humor or use creative analogies where appropriate to keep your audience engaged.
Fact-Checking and Accuracy
While AI tools are efficient, they are not infallible. AI may sometimes generate incorrect information, especially when dealing with complex data or niche topics. Fact-checking is critical to ensure that the information you’re presenting is accurate.
Tip: Double-check any claims, statistics, or facts presented in the AI-generated content to maintain credibility.
Step 4: Add Images – Enhance User Experience and SEO

Midjourney For Image Generation
Why It’s Important
Images are not just visually appealing; they also improve the user experience and contribute to SEO. Blogs with images are more engaging and tend to rank higher in search engine results. Including relevant images also breaks up the text, making the blog more digestible for readers.
How to Do It
You can use stock images from websites like Unsplash or Pexels to complement your blog. If you're focusing on originality, consider using AI tools like DALL-E to generate custom images.
When uploading images, ensure they are properly optimized by compressing them to reduce file size, usually under 200KB. Large images can slow down your website’s loading speed, negatively affecting your SEO.
Alt Text: Add descriptive alt text to every image. Alt text helps search engines understand the context of the image and contributes to your blog’s SEO. For example, for an image of a time management tool, your alt text could be: "A screenshot of a popular time management tool interface."
Tip: Choose images that reflect your content, not just generic stock images. They should enhance the reader’s understanding or engagement with the blog.
Step 5: Internal and External Links – Boost SEO Authority
Why It’s Important
Linking is a crucial component of on-page SEO. Internal links help users navigate your website more easily and distribute SEO authority across your site, while external links build credibility by associating your content with reputable sources.
How to Do It
For internal links, identify relevant pages on your website that you can reference within the blog. For example, if you have another blog on productivity, link to it from your current post. This encourages readers to explore more content, increasing the time they spend on your site (dwell time), which Google considers a ranking factor.
For external links, reference reputable websites that provide high-quality information. For example, you might link to an authoritative article from Forbes, HubSpot, or Google to support your content.
Tip: Ensure that external links open in a new tab, preventing readers from leaving your site altogether.
Step 6: SEO Title and Meta Description – Attract Clicks

Why It’s Important
Your SEO title and meta description are the first things users see when your blog appears on SERPs. A compelling title and description increase click-through rates (CTR) and can help improve your ranking.
How to Do It
Once your blog is written, craft an SEO-friendly title that includes your primary keyword. Keep the title under 60 characters to avoid truncation in search results. For example, for a blog on time management tools, an effective title could be:
"Top 5 Time Management Tools to Boost Your Productivity."
The meta description should summarize the blog in 160 characters or fewer, including the target keyword and a call to action (CTA). For example:
"Discover the top 5 time management tools to help boost your productivity and manage your tasks efficiently. Read now for expert tips!"
Tip: Use action verbs like "Discover," "Learn," or "Find out" to make your meta description more engaging.
Step 7: Index Your Blog with Google Search Console
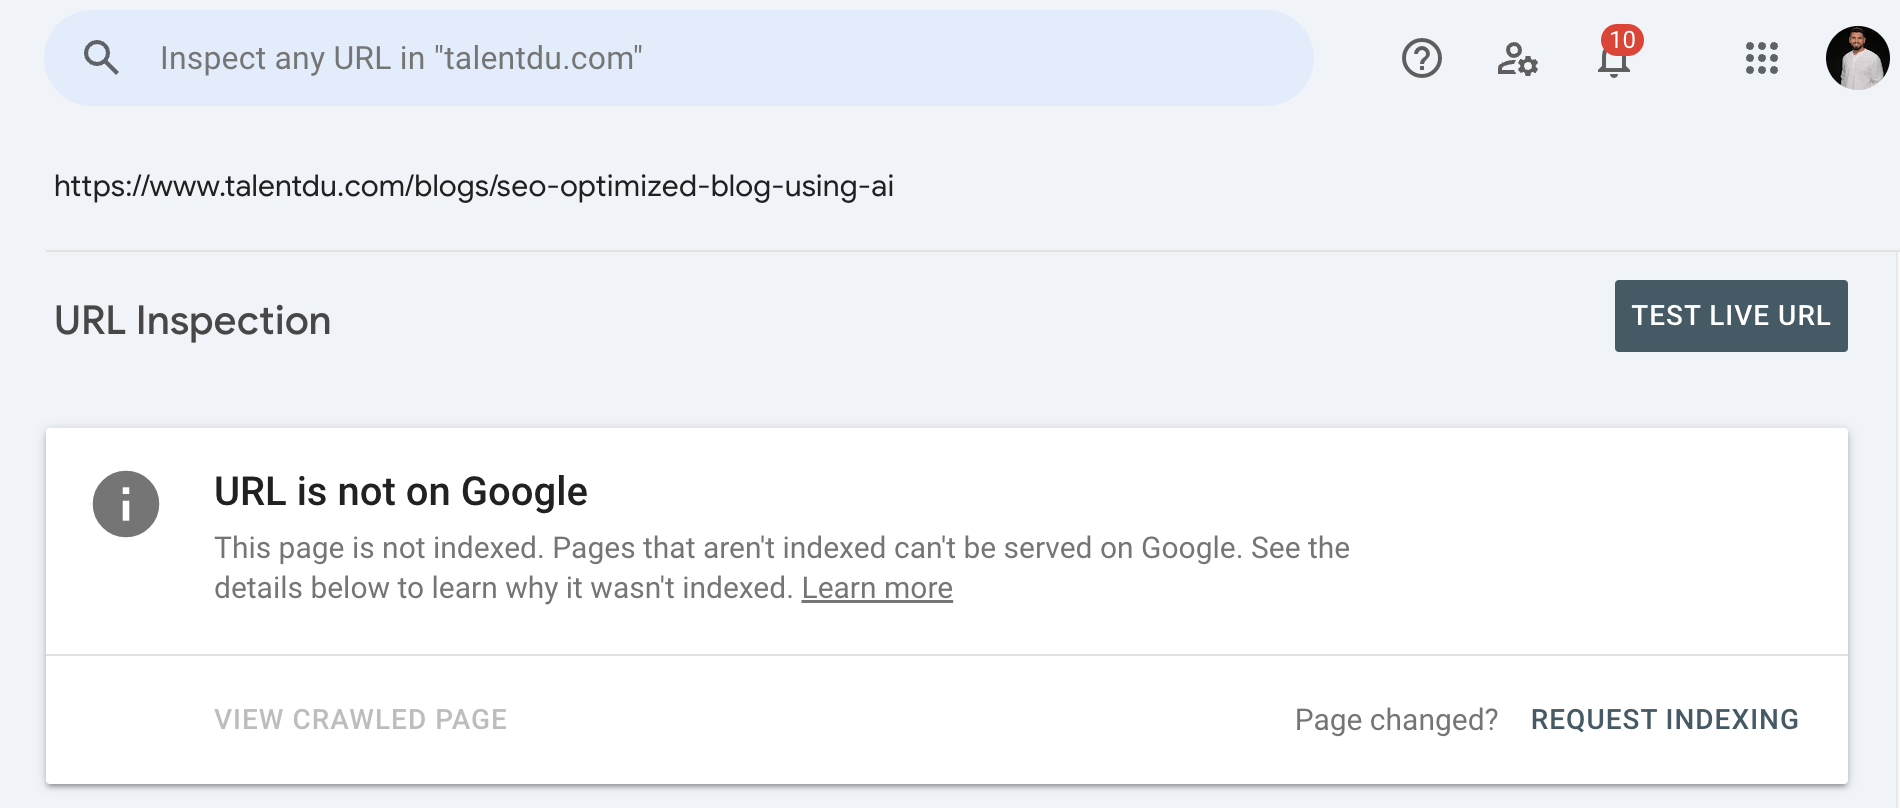
Google Search Console for Indexing
Why It’s Important
Even if you’ve created an SEO-optimized blog, it needs to be indexed by Google before it can appear in search results. Submitting your blog to Google Search Console ensures that Google crawls and indexes your content promptly.
How to Do It
Log into your Google Search Console account, paste the URL of your blog post into the URL Inspection Tool, and request indexing. This speeds up the indexing process, making your blog visible to search engines faster.
Additionally, ensure your XML sitemap is up-to-date, so Google can easily crawl all the pages on your website.
Tip: Use Google Analytics to track the performance of your blog, including traffic, bounce rates, and user engagement.
Step 8: Final SEO Check – Ensure Optimization

Why It’s Important
Before publishing your blog, it’s essential to ensure that all SEO elements are properly in place. A final SEO check can help identify any overlooked areas that might hinder your blog’s ranking potential.
How to Do It
Use SEO tools like Yoast SEO (for WordPress) or Semrush SEO Audit to check for issues such as:
Keyword density: Ensure your target keyword appears naturally throughout the blog.
Meta tags: Double-check your meta title and description for optimal length and keyword usage.
Image optimization: Confirm that all images have alt text and are compressed for faster loading.
Readability: Ensure the content is easy to read, with clear headings and bullet points where necessary.
Step 9: Call to Action (CTA) – Engage Your Readers
Why It’s Important
A call to action (CTA) invites your readers to engage with your content further. Whether you want them to leave a comment, subscribe to your newsletter, or read another blog, a strong CTA can improve user engagement and conversions.
How to Do It
Place your CTA at the end of your blog, making it clear and direct. For example:
"Found this guide helpful? Share it with your network or explore more tips in our SEO blog series!"
You can also offer a free resource, such as a downloadable guide, to encourage users to subscribe to your newsletter.
Conclusion: Write SEO Blogs in Under an Hour with AI
By following these nine steps, you’ll be able to write SEO-optimized blogs in under one hour using AI. From keyword research and drafting with AI to personalizing content and ensuring everything is SEO-friendly, this process will save you time while boosting your content's chances of ranking on Google. As you gain more practice, you’ll streamline this workflow even further.